
Red Shepherd Payment Gateway
WordPress Plugin
Thank you for purchasing Red Shepherd Payment Gateway WordPress
plugin.
To learn more about our Secure payment processing options, Developer friendly API and various Payment channels and features, please visit www.redshepherd.com
If you have questions that are beyond the scope of this documentation,
please feel free to contact us.
Got Questions? - Contact Support
Get a Free Sandbox Account, try our features for free.
Try It - Free Sandbox Account
Register for Production Access.
Get your Production keys and start collecting payments.
Go Live - Get Production Account
Overview
Red Shepherd Payment Gateway WordPress plugin allows you to capture Credit, Debit and ACH Check payments from your WordPress WooCommerce store.
Minimum requirements
- PHP 5.4
- WordPress 4
- WooCommerce 2.4
- JavaScript / jQuery
Sources
- WooCommerce
Credits
-
card
Licensed under the MIT license - https://opensource.org/licenses/MIT, Copyright (c) 2016 Jesse Pollak , https://github.com/jessepollak/card
-
jQuery
Copyright 2014 The jQuery Foundation. jQuery License
Installation
There are two primary methods for installing any WordPress plugin.
Install with a zip file
-
From your WordPress dashboard, choose
Plugins > Add New -
Select
Uploadfrom the set of links at the top of the page (the second link) -
From here, browse for the zip file included in your plugin
downloaded titled
woo-redshepherd-payment-gateway.zip
and click the
Install Nowbutton -
Once installation is complete, click
Activate Pluginto activate it and enable its features.
Use FTP Manager
If you are have no previous web experience and have no idea what an FTP Manager is, then this option is not for you.
- Access your host through the FTP manager
-
Access the plugins directory of your WordPress install
/(WordPress directory)/wp-content/plugins/If WordPress is installed on the root folder the directory is
/wp-content/plugins/ - Find the directory titled woo-redshepherd-payment-gateway and upload it and all files within to the directory from the previous step.
-
From your WordPress dashboard, choose
Plugins > Installed Plugins -
Locate the newly added plugin and click on the
Activatelink to enable its features.
Quick Start Guide
Adding Red Shepherd plugin to your Woo Commerce store is really easy.
Basic plugin usage
Step 1
Go to
Woocommerce > Settings > Payments
Step 2
Mark Red Shepherd Gateway as enabled.
Step 3
Click the Red Shepherd Gateway link and you will be shown this setup page.
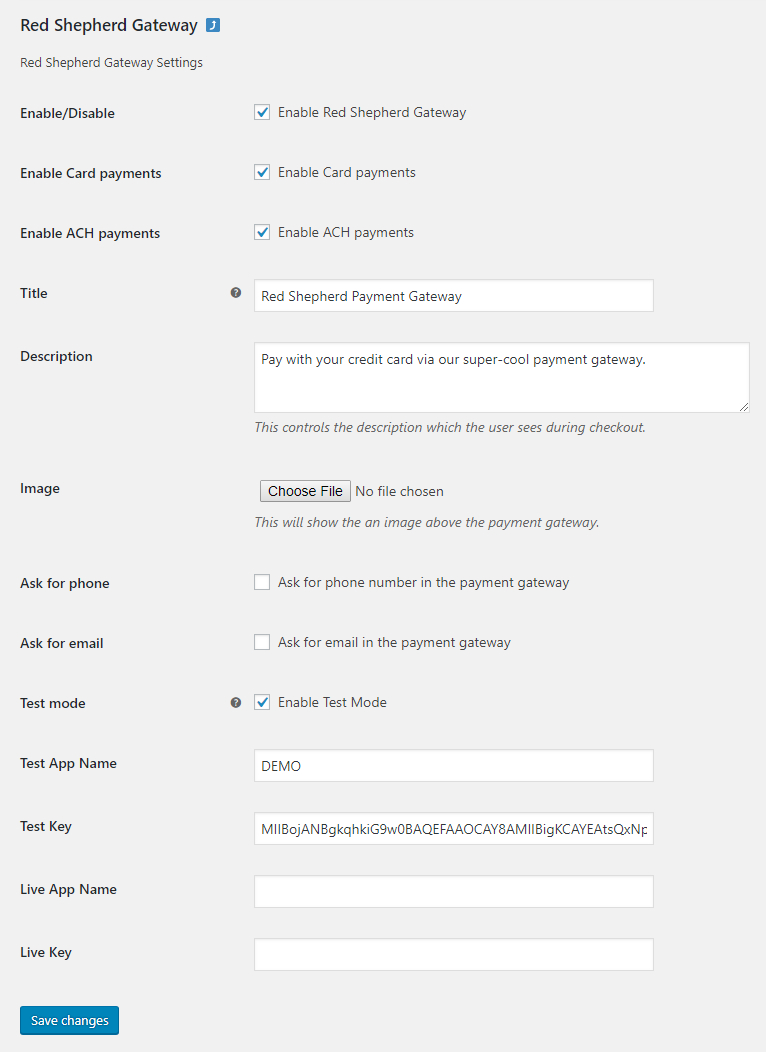
-
Enable / Disable: Enable or Disable the Plugin.
-
Enable Card Payments: Enable Credit and Debit Card Payments.
-
Enable ACH Payments: Enable ACH Payments (Pay by Check)
-
Title: Payment Gateway Title.
-
Description: Payment Gateway Description.
-
Image: Payment Gateway Image.
-
Ask for Phone:Ask for Phone number when processing payments
-
Ask for Email: Ask for Email when processing payments
-
Test mode: Enable Testing Mode.
-
Test App Name: When Test mode enabled user should use DEMO as the app name.
DEMO -
Test Key: When Test mode enabled user should use the Test Key given below
MIIBojANBgkqhkiG9w0BAQEFAAOCAY8AMIIBigKCAYEAtsQxNp3vmKVNYIxfWSi0LIRgCnPaMn0MUNouxgrs4zmg4cnvSeQ3I8YP03YbpXuWA80RvOw/nWErYAKomniJw8Y+xexMfBQ5sgJgewn3ZnRPNM9Y4Z62gwfIlsrs7Bwvpz9uUtLgeQLl1ffNaumnu1IBrqRps0EZ1QyDuu41UckTyo31C40Wez6IbeMfZeusrmPlIWqyBacdviJ5zHCA3zHNq86QMnB8HOP1U81HOSs6GTTelhD7lCoJ+fHKHxcz0MDr37fNpKpC57B0/20wBXFp9tlVtSkHcIty1lyNk2/HDH8knCdqkZk+fCvWgGwdex41x8/rM+LKC13c5J/yG6Gb2PnKhwNk4lvvnz73YAdqTUJ7qNrdtWVnOTWfbMBiNlpBCVqt8xY8UK6u83AVWrWXse0xe2Pn/kRqlXmxWT0mGEoCavjvZ9lQUL7LXAXZ1dff9r+oFUZo6xDQ3ER/OTIKa4jpvaI9S/J1drsrI1f9kkMWFwEh48dCPYplGSxzAgMBAAE= -
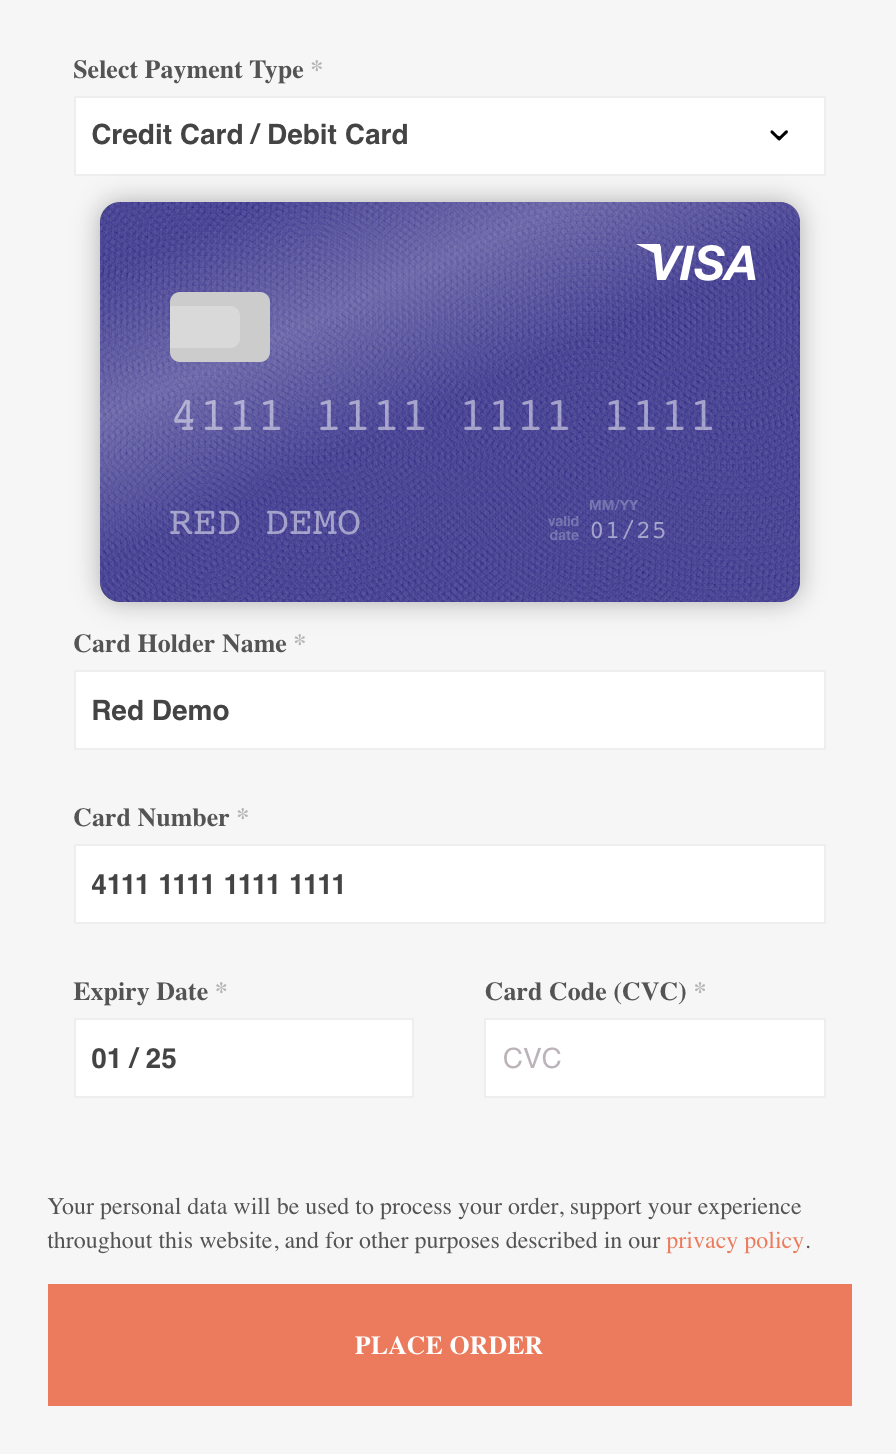
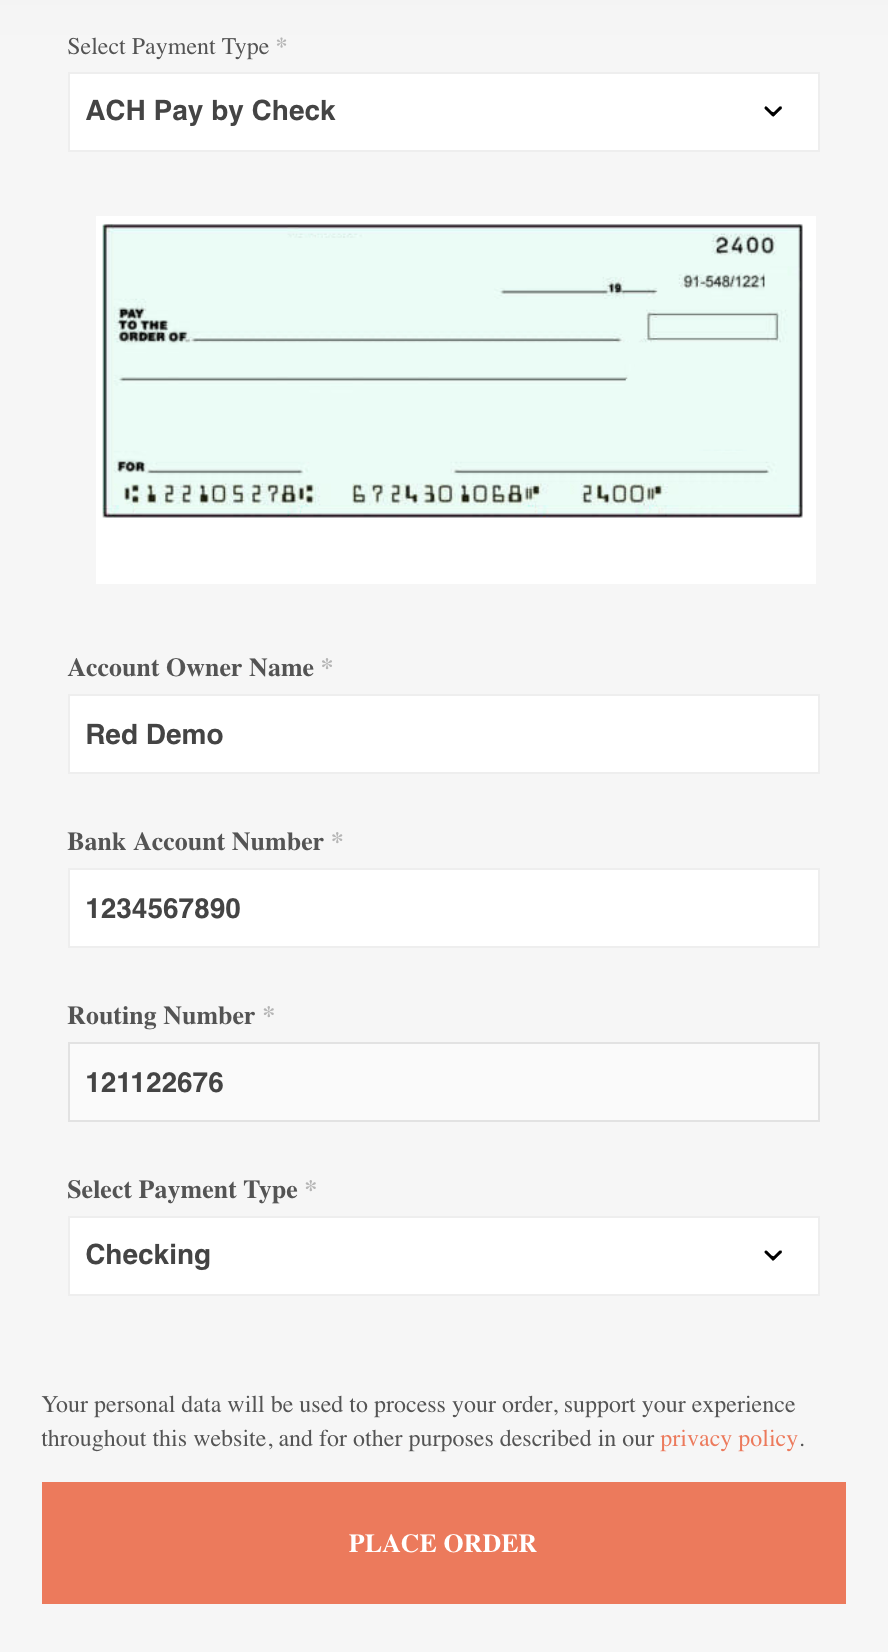
Test Account Numbers: When in Test mode use the following card / accounts to test
Credit Card: 4111 1111 1111 1111 Exp: 01/25 (or any future date) CVC: 123 ACH Account: 1234567890 Routing Number: 121122676 Type: Checking Amount < $100 for testing -
Live App Name: When Test mode is disabled, you should enter your LIVE App Name. Signup for Production account to get your LIVE App Key
-
Live Key: When Test mode is disabled, you should enter your LIVE key.
Go Live - Get Production Account
Step 4
Check Enable Red Shepherd payment gateway.
Enter an appropriate title and description for your payment gateway.
Upload an image
Enter the provided Test App name and key
Enter the Live App name and key (optional)
Step 5
Click the save button
After that you will see the Red Shepherd payment gateway on
checkout page
After testing the plugin successfully, you can uncheck the test mode in the menu and the Payment gateway will accept the Live payments.